This project shows you how you can drag and drop elements within and across different structures in WPF.
You can download the code or see the latest code at GitHub.
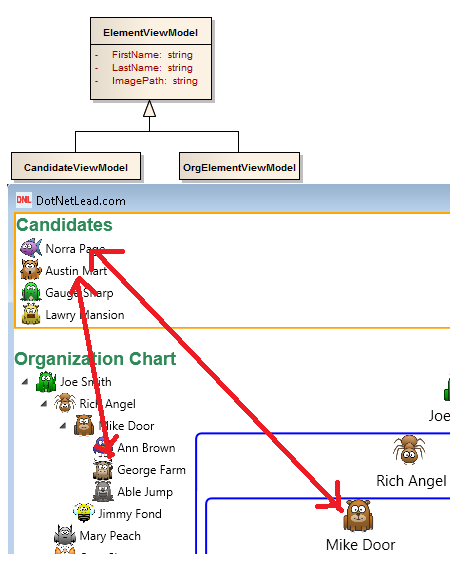
Below is the class diagram of the application:

Starting from the bottom and going up, In the ViewModel section:
- The CandidateViewModel can be dragged (you can drag the candidates), so it implements the IDragable
- The OrgElementViewModel can be dragged and dropped (you can drag and drop into any element in the company organization chart), so it implement both the IDragable and the IDropable
- The CandidateListViewModel can be dropped (you can drop into the candidate list), so it implements the IDropable
In the Behavior section:
- The FrameworkElementDragBehavior — Performs the actions to start the drag operation by picking up the data. It queries the IDragable interface to record the data type being dragged.
- The FrameworkElementDropBehavior — Performs the actions when the drop happens on a FrameworkElement, which is the subclass of System.Windows.UIElement that you commonly see in WPF.
- The ListBoxDropBehavior — Performs the actions when an element is dropped onto a ListBox.
In the View:
- The DetailedView — Contains the nested controls that shows the organization chart. Since the nested controls are FrameworkElement it will just use the FrameworkElementDragBehavior and the FrameworkElementDropBehavior in the xaml declaration.
- The TreeView — Each element in the TreeView are also FrameworkElement, so it will also use the FrameworkElementDragBehavior and the FrameworkElementDropBehavior in the xaml declaration.
- The CandidateView — Candidates are displayed using FrameworkElement, so it will use the FrameworkElementDragBehavior for dragging. A candidate is dropped into a ListBox, which requires more details such as the drop location, therefore it will use the ListBoxDropBehavior.
With this setup you can just add the xaml to the View and the drag and drop functionality will come alive:
|
1 2 3 4 |
<i:Interaction.Behaviors> <b:FrameworkElementDragBehavior/> <b:FrameworkElementDropBehavior/> </i:Interaction.Behavior> |
The main idea on the drag is to pick up the data that will be transferred as well as defining the data type that is transferred. The data type lets the system tell if the item can be dropped when the mouse moves over a particular area.
In the IDragable interface we have the following:
|
1 2 3 4 5 6 7 8 9 10 11 12 |
interface IDragable { /// <summary> /// Type of the data item /// </summary> Type DataType { get; } /// <summary> /// Remove the object from the collection /// </summary> void Remove(object i); } |
The DataType property returns the type of the data that is being dragged.
The Remove method removes the source data for a move operation. If it’s a copy operation then you simply don’t call it. In our application we will only implement the move operation per our business logic, though you can add the copy functionality if you like.
The IDragable interface is implemented in the ViewModel. In both the CandidateViewModel and the OrgElementViewModel we return the DataType as ElementViewModel:
|
1 2 3 4 5 6 |
#region IDragable Members Type IDragable.DataType { get { return typeof(ElementViewModel); } } |
ElementViewModel is the parent class of both ViewModels, which contains common properties such as the FirstName and the LastName. This allows you to drag items between the two types interchangeably:
The Remove method in the ViewModel simply calls the Model to perform the business logic on removing the element. You can look into the source code if you are interested in the details of the business logic.
Next we define the drag behavior, meaning what would we like to do when a drag occurs. The FrameworkElementDragBehavior class inherits from the System.Windows.Interactivity.Behavior class, which allows you to define the actions that you like to perform for events such as a mouse click or a mouse move. Below is the code:
|
1 2 3 4 5 6 7 8 9 10 11 12 13 14 15 16 17 18 19 20 21 22 23 24 25 26 27 28 29 30 31 32 33 34 35 36 37 38 39 40 41 42 43 44 45 46 47 48 49 |
using System; using System.Collections.Generic; using System.Linq; using System.Text; using System.Windows; using System.Windows.Interactivity; using System.Windows.Input; namespace DotNetLead.DragDrop.UI.Behavior { public class FrameworkElementDragBehavior : Behavior<FrameworkElement> { private bool isMouseClicked = false; protected override void OnAttached() { base.OnAttached(); this.AssociatedObject.MouseLeftButtonDown += new MouseButtonEventHandler(AssociatedObject_MouseLeftButtonDown); this.AssociatedObject.MouseLeftButtonUp += new MouseButtonEventHandler(AssociatedObject_MouseLeftButtonUp); this.AssociatedObject.MouseLeave += new MouseEventHandler(AssociatedObject_MouseLeave); } void AssociatedObject_MouseLeftButtonDown(object sender, MouseButtonEventArgs e) { isMouseClicked = true; } void AssociatedObject_MouseLeftButtonUp(object sender, MouseButtonEventArgs e) { isMouseClicked = false; } void AssociatedObject_MouseLeave(object sender, MouseEventArgs e) { if (isMouseClicked) { //set the item's DataContext as the data to be transferred IDragable dragObject = this.AssociatedObject.DataContext as IDragable; if (dragObject != null) { DataObject data = new DataObject(); data.SetData(dragObject.DataType, this.AssociatedObject.DataContext); System.Windows.DragDrop.DoDragDrop(this.AssociatedObject, data, DragDropEffects.Move); } } isMouseClicked = false; } } } |
The AssociatedObject property from the parent class is the UI control in which the behavior is bound to. For example, if we add this behavior to a StackPanel xaml declaration, then the AssociatedObject is the StackPanel.
If the mouse is clicked down (and kept down) and moves out of the area then we start the drag operation. When you have nested controls such as the detailed view of the organization chart this is the most reliable way to detect the drag. If you don’t have nested controls you may just use the MouseMove event and check the mouse pressed state from MouseEventArgs.
In the MouseLeave event we check the DataContext of the UI control and see if it implements IDragable. If yes then that means the item can be dragged. We then get the data type being dragged by calling the IDragable interface and start the drag operation by calling System.Windows.DragDrop.DoDragDrop method.
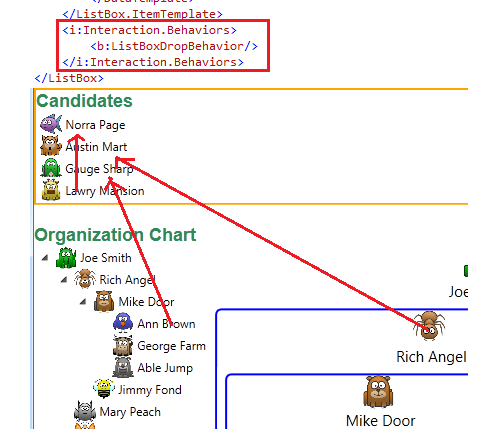
To enable the drag operation we simply add the xaml to the View for the control that you would like to drag. For example in the TreeView we defined the following to drag the StackPanel from the TreeView:
|
1 2 3 4 5 6 7 8 9 10 11 12 13 14 15 16 17 18 19 20 21 22 |
xmlns:i="http://schemas.microsoft.com/expression/2010/interactivity" xmlns:b="clr-namespace:DotNetLead.DragDrop.UI.Behavior" > <StackPanel> <TreeView x:Name="tvMain" ItemsSource="{Binding Root}" BorderThickness="0"> <TreeView.ItemTemplate> <HierarchicalDataTemplate ItemsSource="{Binding Children}"> <StackPanel Orientation="Horizontal"> <Image Source="{Binding ImagePath}" MaxHeight="22" MaxWidth="22"/> <TextBlock VerticalAlignment="Center"> <TextBlock.Text> <MultiBinding StringFormat=" {0} {1}"> <Binding Path="FirstName"/> <Binding Path="LastName"/> </MultiBinding> </TextBlock.Text> </TextBlock> <i:Interaction.Behaviors> <b:FrameworkElementDragBehavior/> <b:FrameworkElementDropBehavior/> </i:Interaction.Behaviors> </StackPanel> |
And the same goes for the Detailed View:
|
1 2 3 4 |
<i:Interaction.Behaviors> <b:FrameworkElementDragBehavior/> <b:FrameworkElementDropBehavior/> </i:Interaction.Behaviors> |
and the Candidate View:
|
1 2 3 |
<i:Interaction.Behaviors> <b:FrameworkElementDragBehavior/> </i:Interaction.Behaviors> |
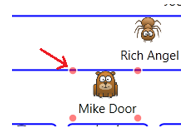
The goal of the drop operation is to:
- Give visual cues on if the item can be dropped into an area when the mouse hovers over
- Transfer the data to the destination
- Remove the data from the source (if it’s a move operation and not a copy operation)
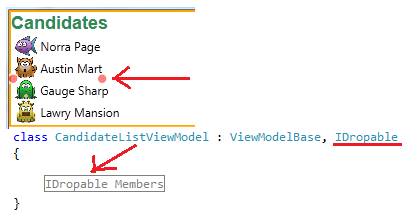
Below is our IDropable interface:
|
1 2 3 4 5 6 7 8 9 10 11 12 13 14 |
interface IDropable { /// <summary> /// Type of the data item /// </summary> Type DataType { get; } /// <summary> /// Drop data into the collection. /// </summary> /// <param name="data">The data to be dropped</param> /// <param name="index">optional: The index location to insert the data</param> void Drop(object data, int index = -1); } |
The DataType property defines the data type that can be dropped into an area. Just like the drag operation, we define the DataType that can be dropped as ElementViewModel in the ViewModel so that we can perform drag and drop between the candidate list and the company organization chart:
|
1 2 3 4 5 6 |
#region IDropable Members Type IDropable.DataType { get { return typeof(ElementViewModel); } } |
The Drop method adds the data to the target. The optional index parameter is for the location of the drop such as a ListBox which we will cover in the next section. Since the ViewModel implements this interface, the method simply calls the business logic in the Model. You can look into the source code if you are interested on the business logic implementation.
Next we will look at the FrameworkElementDropBehavior class. Similar to the drag behavior, the FrameworkElementDropBehavior is inherited from the Behavior class, but we define other events that we will handle. Below shows the list of events:
|
1 2 3 4 5 6 7 8 9 10 11 12 13 14 15 16 17 18 19 20 21 22 23 24 25 26 27 28 29 30 31 32 33 34 35 36 37 38 39 40 41 42 43 44 45 46 47 48 49 50 51 52 53 54 55 56 57 58 59 60 61 62 63 64 65 66 |
void AssociatedObject_Drop(object sender, DragEventArgs e) { if (dataType != null) { //if the data type can be dropped if (e.Data.GetDataPresent(dataType)) { //drop the data IDropable target = this.AssociatedObject.DataContext as IDropable; target.Drop(e.Data.GetData(dataType)); //remove the data from the source IDragable source = e.Data.GetData(dataType) as IDragable; source.Remove(e.Data.GetData(dataType)); } } if (this.adorner != null) this.adorner.Remove(); e.Handled = true; return; } void AssociatedObject_DragLeave(object sender, DragEventArgs e) { if (this.adorner != null) this.adorner.Remove(); e.Handled = true; } void AssociatedObject_DragOver(object sender, DragEventArgs e) { if (dataType != null) { //if item can be dropped if (e.Data.GetDataPresent(dataType)) { //give mouse effect this.SetDragDropEffects(e); //draw the dots if (this.adorner != null) this.adorner.Update(); } } e.Handled = true; } void AssociatedObject_DragEnter(object sender, DragEventArgs e) { //if the DataContext implements IDropable, record the data type that can be dropped if (this.dataType == null) { if (this.AssociatedObject.DataContext != null) { IDropable dropObject = this.AssociatedObject.DataContext as IDropable; if (dropObject != null) { this.dataType = dropObject.DataType; } } } if (this.adorner == null) this.adorner = new FrameworkElementAdorner(sender as UIElement); e.Handled = true; } |
In the DragEnter event we record the data type that can be dropped into this area (so that we can decide the visual cues to give), and we initialize the adorner for displaying the red dots around the corner:
|
1 2 |
private Type dataType; //the type of the data that can be dropped into this control private FrameworkElementAdorner adorner; |
|
1 2 3 4 5 6 7 8 9 10 11 12 13 14 15 16 17 18 19 |
void AssociatedObject_DragEnter(object sender, DragEventArgs e) { //if the DataContext implements IDropable, record the data type that can be dropped if (this.dataType == null) { if (this.AssociatedObject.DataContext != null) { IDropable dropObject = this.AssociatedObject.DataContext as IDropable; if (dropObject != null) { this.dataType = dropObject.DataType; } } } if (this.adorner == null) this.adorner = new FrameworkElementAdorner(sender as UIElement); e.Handled = true; } |
In the DragOver event we will decide if the data type can be dropped. If yes then we need to show the mouse cursor as an item that can be dropped plus drawing the red dots around the corner of the destination by calling the adorner:
|
1 2 3 4 5 6 7 8 9 10 11 12 13 14 15 16 |
void AssociatedObject_DragOver(object sender, DragEventArgs e) { if (dataType != null) { //if item can be dropped if (e.Data.GetDataPresent(dataType)) { //give mouse effect this.SetDragDropEffects(e); //draw the dots if (this.adorner != null) this.adorner.Update(); } } e.Handled = true; } |
|
1 2 3 4 5 6 7 8 9 10 11 12 13 14 |
/// <summary> /// Provides feedback on if the data can be dropped /// </summary> /// <param name="e"></param> private void SetDragDropEffects(DragEventArgs e) { e.Effects = DragDropEffects.None; //default to None //if the data type can be dropped if (e.Data.GetDataPresent(dataType)) { e.Effects = DragDropEffects.Move; } } |
In the DragLeave event we remove the red dots around the corner by calling the adorner:
|
1 2 3 4 5 6 |
void AssociatedObject_DragLeave(object sender, DragEventArgs e) { if (this.adorner != null) this.adorner.Remove(); e.Handled = true; } |
In the Drop event we perform the data transfer. We simply call the Drop method of the IDropable interface to add data to the destination, and call the Remove method of the IDragable interface to remove the data from the source:
|
1 2 3 4 5 6 7 8 9 10 11 12 13 14 15 16 17 18 19 20 21 22 |
void AssociatedObject_Drop(object sender, DragEventArgs e) { if (dataType != null) { //if the data type can be dropped if (e.Data.GetDataPresent(dataType)) { //drop the data IDropable target = this.AssociatedObject.DataContext as IDropable; target.Drop(e.Data.GetData(dataType)); //remove the data from the source IDragable source = e.Data.GetData(dataType) as IDragable; source.Remove(e.Data.GetData(dataType)); } } if (this.adorner != null) this.adorner.Remove(); e.Handled = true; return; } |
And that’s all the behavior we need to define. By adding the xaml tags to the View and we can drop the items into any FrameworkElement:
|
1 2 3 4 5 6 7 8 9 10 11 12 13 14 15 |
<StackPanel Orientation="Horizontal"> <Image Source="{Binding ImagePath}" MaxHeight="22" MaxWidth="22"/> <TextBlock VerticalAlignment="Center"> <TextBlock.Text> <MultiBinding StringFormat=" {0} {1}"> <Binding Path="FirstName"/> <Binding Path="LastName"/> </MultiBinding> </TextBlock.Text> </TextBlock> <i:Interaction.Behaviors> <b:FrameworkElementDragBehavior/> <b:FrameworkElementDropBehavior/> </i:Interaction.Behaviors> </StackPanel> |
Now we show you how to drop items into a ListBox.
First notice that the IDropable interface for the candidates is in the CandidateListViewModel and not the CandidateViewModel, because we will drop items into the candidate list and into a single candidate:
Next we write the ListBoxDropBehavior class with the events that we would like to handle. The events are the same as those defined in the FrameworkElementDropBehavior class but the code is made specifically for dropping items into a ListBox:
|
1 2 3 4 5 6 7 8 9 10 11 12 13 14 15 |
public class ListBoxDropBehavior : Behavior<ItemsControl> { private Type dataType; //the type of the data that can be dropped into this control private ListBoxAdornerManager insertAdornerManager; protected override void OnAttached() { base.OnAttached(); this.AssociatedObject.AllowDrop = true; this.AssociatedObject.DragEnter += new DragEventHandler(AssociatedObject_DragEnter); this.AssociatedObject.DragOver += new DragEventHandler(AssociatedObject_DragOver); this.AssociatedObject.DragLeave += new DragEventHandler(AssociatedObject_DragLeave); this.AssociatedObject.Drop += new DragEventHandler(AssociatedObject_Drop); } |
In the DragEnter event we initialize the adorner layer to be the area covering the entire ListBox, this is so that we can add and remove adorners for individual items in the ListBox:
|
1 2 3 4 5 6 7 8 9 10 11 12 13 14 15 16 17 18 19 |
void AssociatedObject_DragEnter(object sender, DragEventArgs e) { if (this.dataType == null) { //if the DataContext implements IDropable, record the data type that can be dropped if (this.AssociatedObject.DataContext != null) { if (this.AssociatedObject.DataContext as IDropable != null) { this.dataType = ((IDropable)this.AssociatedObject.DataContext).DataType; } } } //initialize adorner manager with the adorner layer of the itemsControl if (this.insertAdornerManager == null) this.insertAdornerManager = new ListBoxAdornerManager(AdornerLayer.GetAdornerLayer(sender as ItemsControl)); e.Handled = true; } |
In the DragOver event we need to show the red dots above or under the item that we will be dropping over. We first get the UIElement that is dropped over from the mouse position relative to the ListBox, then determine if it is above or below the item and call the adorner manager to update the red dots:
|
1 2 3 4 5 6 7 8 9 10 11 12 13 14 15 16 17 18 |
void AssociatedObject_DragOver(object sender, DragEventArgs e) { if (this.dataType != null) { if (e.Data.GetDataPresent(dataType)) { this.SetDragDropEffects(e); if (this.insertAdornerManager != null) { ItemsControl dropContainer = sender as ItemsControl; UIElement droppedOverItem = UIHelper.GetUIElement(dropContainer, e.GetPosition(dropContainer)); bool isAboveElement = UIHelper.IsPositionAboveElement(droppedOverItem, e.GetPosition(droppedOverItem)); this.insertAdornerManager.Update(droppedOverItem, isAboveElement); } } } e.Handled = true; } |
Since the DragOver event is executed continuously when the mouse is over the area, we need the update of the adorners to be efficient. In the Update method of the adorner manager we simply exit the method if no change is needed, otherwise we clear the old adorner and draw a new one:
|
1 2 3 4 5 6 7 8 9 10 11 12 13 14 15 |
internal void Update(UIElement adornedElement, bool isAboveElement) { if (adorner != null && !shouldCreateNewAdorner) { //exit if nothing changed if (adorner.AdornedElement == adornedElement && adorner.IsAboveElement == isAboveElement) return; } this.Clear(); //draw new adorner adorner = new ListBoxAdorner(adornedElement, this.adornerLayer); adorner.IsAboveElement = isAboveElement; adorner.Update(); this.shouldCreateNewAdorner = false; } |
In the DragLeave event we clear the adorner from the ListBox:
|
1 2 3 4 5 6 |
void AssociatedObject_DragLeave(object sender, DragEventArgs e) { if (this.insertAdornerManager != null) this.insertAdornerManager.Clear(); e.Handled = true; } |
In the Drop event we will insert the new item at the correct location in the ListBox. We first get the UIElement that was dropped over from the mouse position relative to the ListBox, then we find the correct index to insert the item. Finally we call the Drop method of the IDropable interface to insert the data:
|
1 2 3 4 5 6 7 8 9 10 11 12 13 14 15 16 17 18 19 20 21 22 23 24 25 26 27 28 29 30 31 32 33 34 |
void AssociatedObject_Drop(object sender, DragEventArgs e) { //if the data type can be dropped if (this.dataType != null) { if (e.Data.GetDataPresent(dataType)) { //first find the UIElement that it was dropped over, then we determine if it's //dropped above or under the UIElement, then insert at the correct index. ItemsControl dropContainer = sender as ItemsControl; //get the UIElement that was dropped over UIElement droppedOverItem = UIHelper.GetUIElement(dropContainer, e.GetPosition(dropContainer)); int dropIndex = -1; //the location where the item will be dropped dropIndex = dropContainer.ItemContainerGenerator.IndexFromContainer(droppedOverItem) + 1; //find if it was dropped above or below the index item so that we can insert //the item in the correct place if (UIHelper.IsPositionAboveElement(droppedOverItem, e.GetPosition(droppedOverItem))) //if above { dropIndex = dropIndex - 1; //we insert at the index above it } //remove the data from the source IDragable source = e.Data.GetData(dataType) as IDragable; source.Remove(e.Data.GetData(dataType)); //drop the data IDropable target = this.AssociatedObject.DataContext as IDropable; target.Drop(e.Data.GetData(dataType), dropIndex); } } if (this.insertAdornerManager != null) this.insertAdornerManager.Clear(); e.Handled = true; return; } |
And that’s all. Just add the xaml to the CandidateView and you can then drop items into it:
Although there are a lot more things that you can do, we hope you find this project helpful in implementing your own WPF drag and drop applications.