This project shows you how to take advantage of the configuration feature of Azure Static Web Apps by using Azure Functions.
You can download the code or see the code at GitHub.
This project was built using the Starter Application HERE as the starting point.
When you deploy an application to Azure Static Web Apps, let it be Angular, React, or Vue, you will most likely need to update the application’s configuration without having to recompile or redeploy. This is where the configuration section of the Azure Static Web Apps comes into place. The question is, how can a static web application get the configuration from Azure and what is the structure needed? The answer is by using Azure Functions to serve up the configuration as an API inside your static web application, as well as including the location of the Azure Function in the build definition of the application.
If you are not familiar with how to deploy applications to Azure Static Web Apps, be sure to check out my previous article on Building and deploying Angular applications using GitHub and Azure.
Setting up the Azure Function
The first thing is to create the Azure Function for serving the configuration as an API. We will use Angular as our example. In Visual Studio Code, open your Angular application, then press F1 to open the Command Palette and type Azure Static Web Apps: Create HTTP Function as shown below (install the Azure Functions extension if prompted):

Select JavaScript as the language, and “settings” as the function name:
- language: Javascript
- function name: settings
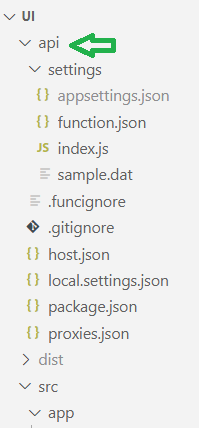
Your application will now have an extra api folder with structure as below, this is the Azure Function:

Add the configuration you would like to use in local.settings.json. In the example I added a configuration called apiCustomer that I would like my application to be able to read:
|
1 2 3 4 5 6 7 8 |
{ "IsEncrypted": false, "Values": { "AzureWebJobsStorage": "", "FUNCTIONS_WORKER_RUNTIME": "node", "apiCustomer": "https://localhost:44381/api/customer" } } |
Update index.js with code as below, which will return the apiCustomer configuration:
|
1 2 3 4 5 6 7 8 9 10 11 |
module.exports = async function (context, req) { context.log('JavaScript HTTP trigger function processed a request.'); //process.env reads from local.settings.json const apiCustomer = process.env.apiCustomer; context.res = { status: 200, body: { apiCustomer } }; } |
The process.env object can read the Values property in local.settings.json, therefore we use it to read the configuration. If you have 2 configurations then the response from context.res.body would be config1, config2, and so on:
|
1 |
body: { config1, config2 } |
Update Angular
Typically the configurations for Angular applications are in the environment.ts file, which has the drawback of not being able to change the configuration once it has been built for deployment. In another words, the configurations in environment.ts is set at compile time rather than runtime. Instead we want to set the configuration at runtime by reading the configuration from the Azure Function.
To do so, first add the AppConfigService service, which will read the configuration served by the Azure Function on {applicationURL}/api/settings:
|
1 2 3 4 5 6 7 8 9 10 11 12 13 14 15 16 17 18 19 20 21 22 23 24 25 26 27 28 29 30 31 |
import { Injectable } from '@angular/core'; import { HttpClient } from '@angular/common/http'; import { Subject } from 'rxjs'; @Injectable({ providedIn: 'root' }) export class AppConfigService { private config: Object; public configSubject$: Subject<Object> = new Subject<Object>(); constructor(private _http: HttpClient) { } public load() { return this._http.get('api/settings') .toPromise() .then((config: Object) => { this.config = config; this.configSubject$.next(this.config); }) .catch((err: Object) => { console.error(err); }) } get(key: string) { return this.config[key]; } } |
then add the APP_INITIALIZER from angular core in app.module.ts, along with the AppConfigService, the initConfig function and the provider:
|
1 2 3 4 5 6 7 8 9 10 11 12 13 14 15 16 17 18 19 |
import { NgModule, APP_INITIALIZER } from '@angular/core'; import { AppConfigService } from './service/app-config.service'; ... export function initConfig(appConfig: AppConfigService) { return () => appConfig.load(); } @NgModule({ ... providers: [ { provide: APP_INITIALIZER, useFactory: initConfig, deps: [AppConfigService], multi: true, }] }) export class AppModule { } |
With the APP_INITIALIZER, the application will be able to read the configuration before the application is run. To read the configuration, you can just call the get() method of the AppConfigService, which is done in the CustomerService:
|
1 2 3 4 5 6 7 |
export class CustomerService { readonly url = this.appConfig.get('apiCustomer'); constructor(private http: HttpClient, private appConfig: AppConfigService) { }; |
Test run the Angular application and Azure Function Locally
Before pushing to Azure, you want to make sure it can read the configuration locally on your computer. First install the Azure Static Web Apps CLI:
|
1 |
npm install -g @azure/static-web-apps-cli |
then install Azure Functions Core Tools:
|
1 |
npm install -g azure-functions-core-tools@3 |
then build the application:
|
1 |
npm run build --prod |
test run the application along with the Azure Function API with the command below, which will run the application on localhost:4280, and you can also see the Azure Function API on localhost:4280/api/settings
|
1 |
swa start dist --api api |
local application shown below:

local Azure Function API shown below:

Deploying to Azure
If you are not familiar with how to deploy Angular applications to Azure Static Web Apps, be sure to check out Building and deploying Angular applications using GitHub and Azure.
In GitHub, under the workflows folder, set the build definition with the path below, which includes the path to the Azure Function as the api_location:
|
1 2 3 4 |
app_location: "/ui" # App source code path api_location: "/ui/api" # Api source code path - optional output_location: "dist" # Built app content directory - optional app_build_command: "npm run build --prod" |
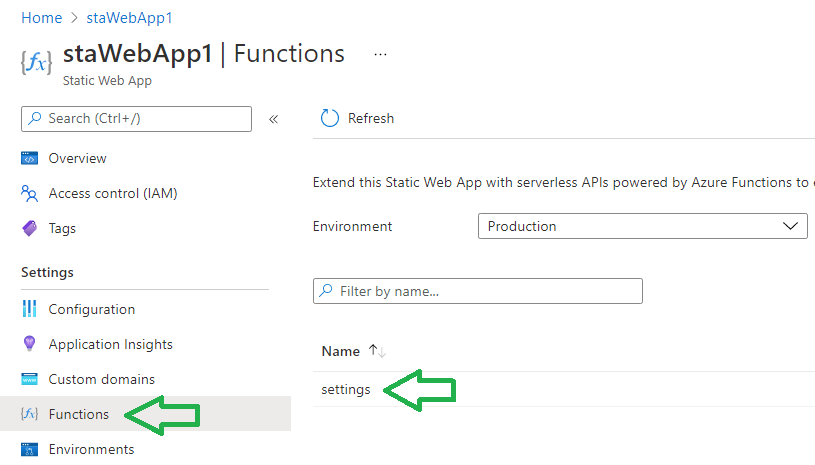
After the application is deployed by GitHub Actions, you should be able to see the Azure Function registered on the Azure Portal:

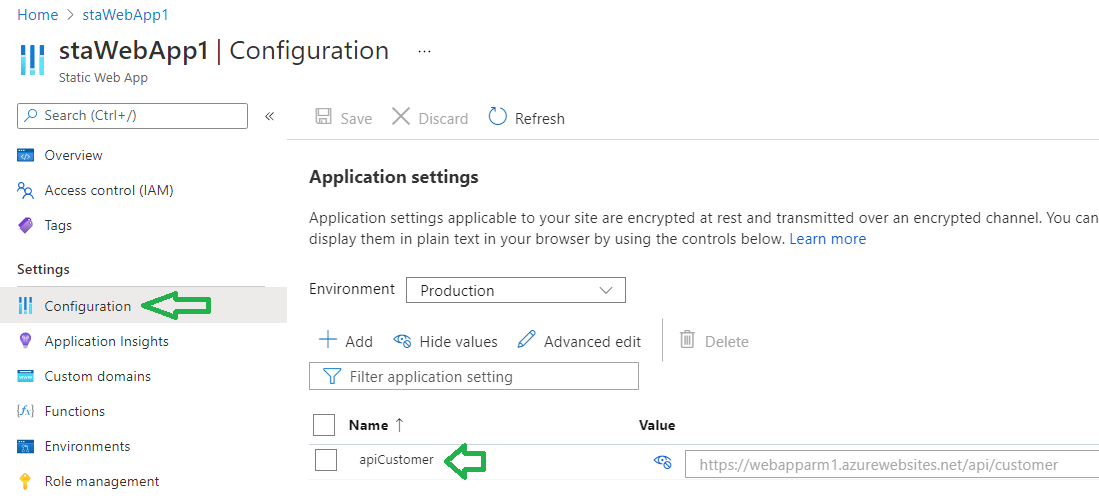
Important: The configuration you have saved in local.settings.json will not be deployed by GitHub, since by default it is being ignored by .gitignore in the Azure Function. Once you have confirmed that the Azure Function is in Azure, all you have to do is add the configuration in the Configuration section of the Azure Portal as shown below:

Below you can see the application in Azure:

And the configuration from Azure Function at {applicationUrl}/api/settings:

And that’s all, hope you will find this information useful in setting up your static web applications in Azure.
